One seed can start a garden, one candle can light a room, one step can begin a journey, one conversation can start a friendship, one smile from a handmade card can lift one's SPIRIT!

Thursday, May 28, 2015

Freshy Made Sketches # 188

There is a sketch up for the new Freshly Made Sketches.
I decided to do the partial die cutting again with a butterfly for my design.
Since I wanted a sympathy card, I wanted to keep it pretty simple.
I sponged on the background with some distress inks.
Here is the sketch and all the info for this challenge

Now that I look at it I think I need some sequins, so I think I will add those!
Thanks for taking a look!
This is my last full day with Linda...we have been having fun trying new techniques and playing with water brush pens.  It is always fun to be inspired by a good friend!

Wednesday, May 27, 2015

Color Throwdown #344

I am entering this in the current
Color Throwdown Challenge

stamps & die:  Avery Elle: Get Well
I fussy cut the sentiment and adhered it with dimensional tape.
The panel is embossed with the wood grain EP from PTI .
I colored it with copics and embossed the sentiment with a Ranger Embossing powder.
Thanks for taking a look!

Colour Q # 292

Because there is an extension in this Colour Q challenge I was able to post this card.
The technique for this card was from Julie Ebersol over at The Classroom.
she showed how to do a special and partial die cutting.
I love this and it was really easy, go check it out on the blog.

I used a nestabilities circle die and the dies from PTI Bitty Bouquets.
The sentiment was embossed with Ranger pink embossing powder which is so pretty and so easy to
emboss, it is yummy!  And I love the color, it really looks more like Berry Sorbet  which is the color I used for the strawberry slush.
The background was sponged on with distress inks with the same yellow, orange and aqua colors.
Thanks for taking a look!

Tuesday, May 26, 2015

Merry Monday # 160

 
I am with my BFF, Linda and we spent the day making cards.
She saw yesterday that the Merry Monday Challenge was a "newsprint"... we were at Impress, a stamp store in Tukwila, Washington and we looked for newsprint paper, couldn't find any, but did find these newsprint tags, so I bought it for us to use.
The poinsettia is from Clearly Besotted:  Pretty Poinsettia which I fussy cut! The greenery is from
PTI Peaceful Pinecones and the sentiment is PTI:  Keep it Simple:  Christmas.
 
I had a great time watching my granddaughters play volleyball, unfortunately my younger one, who is 11 got hurt on the first match of the tournament and was unable to play the rest of the games.
On Sunday we had to be at the gym at 7:30 and my older granddaughter didn't finish until after 9:30 PM... that was ONE LONG day in the gym!!  I bailed on Monday... had my husband drive me to Tukwila to meet up with Linda so we could do some shopping.  I am staying with her until Friday, then I will take the train home.
It is always more fun to craft with a friend!
 
Have a great week friends!
 

Friday, May 22, 2015

a little Watercoloring...

I couldn't resist the new Zig Clean Color Real Brush Pens
and they are the easiest water color pens to use!
Here is a sympathy card I made using the pens and an
Altnew stamp:  Persian Motifs
I am entering this in the Live Love Cards Watercolor challenge.

I white embossed the images then used the water color pens, I used two for the flowers, yellow and lite carmine and used lite green for the leaves, but by going soft, I was able to pull some of the color and then add more for the shading.  I outlined the image with a cobalt blue pen.
The sentiment is from PTI Think Big

Heading to Seattle for a 3 day Volleyball tournament for the granddaughters, then I am staying 5 days with my BFF for some fun stamping time!

Seize the Birthday ~ NO Topping

Time for another Seize the Birthday Challenge
And this time there is NO TOPPING!!  Just just make any birthday card that pleases you!
Awhile back my BFF, Linda was here for a week and she brought some of her special dies and stamps that I do not have.  This was her PTI Block party die.  I thought it would look terrific in black and red.  I actually already gave this to my SIL for his birthday.
I used my Martha Stewart scoring board and scored lines on my fine linen paper for the background to add some other interest to the card.  I then placed everything on a white card base.

Thanks for taking a look and we hope to see you over at the challenge!

Tuesday, May 19, 2015

The Challenge # 35

The Challenge has an inspiration photo
Here I used PTI Sweet Life along with the jar from Friendship Jar: Summer
My jar was die cut using the dotted vellum.
Some lime sorbet Pretty Pink Posh sequins were used also.
 
thanks for taking a look!

Monday, May 18, 2015

MIM # 212 Fussy Cutting

Ashley has a video up at PTI blog showing how she fussy cuts around words that do not have dies!
I stamped and fussy cut just like she showed...I used the word from Life is Beautiful.
I masked off the card face and then used some distress inks for the background.
The small Beautiful Butterflies were inked up with Versafine black ink.
 
the inside of the card.

Fun technique!  I will try it again!
Have a great week!

Merry Monday ~ Non Evergreen Trees

The new Merry Monday Challenge asks us to use a Non Evergreen tree for our Christmas card.  I have the Impression Obsession dies of the birch trees...YEAH!
I started out with some Distress inks sponged on the paper:  peacock feathers at the bottom of the card, then worked up to dusty concord and finally some Colorbox Sky Gray pigment ink.  I used a little Gathered Twig on the birch trees.
The little deer is also a trio from Impression obsession.
(the hoof prints are from PTI In the Meadow)
The falling snow was made using irRESISTible pico embellisher.

Friday, May 15, 2015

Sparkle & Shine Challenge May 15

A photo inspiration over at Sparkle & Shine Challenge

 
I used the rose from Clearly Besotted: Happy Everything and colored it with copics.
A Winnie & Walter gift card is going to the winner selected for this challenge!
 

Thursday, May 14, 2015

Freshly Made Sketches # 186 & Colour Me # 71

I needed another Baby shower card...this time it is a little girl!
I couldn't resist the Ellie & Friends Elephant from Mama Elephant again and the umbrella from WPlus9 Pretty Patches Umbrella which I did some selective die cutting to make the handle a wee bit longer!
Once again I have some falling hearts...(I did just order a raindrop stencil!)
This card is going in two challenges!!  I know surprise, surprise...I can handle it if one is a sketch and one is a color challenge...ha ha!
the first is a sketch from Freshly Made Sketches # 186
 
And the second challenge is Colour Me # 71 
Thanks for taking a look!

Wednesday, May 13, 2015

Confirmation and First Communion

My daughter asked me for two confirmation cards for this coming Saturday....
I didn't really know how I was going to make a confirmation card, but I guess the Holy Spirit gave me some mojo because this is what I came up with!
I sponged some distress inks onto my card base, then using a Verve Cross stamp, I wet it with water and placed it down on the ink, I actually did it twice..and you all know that distress reacts to water, so it gave a nice subtle soft cross look.
My "Holy Spirit" is a Paper Smooches stamp from "A Blessed Christmas".
The sentiment was just typed on my computer.
My grandson is receiving his First Communion this Sunday and sweet Marybeth sent me two chalices...small and large.  I made a bookmark with the smaller chalice.
Thank you so much, Marybeth!

Monday, May 11, 2015

Merry Monday # 158 Stencil

Merry Monday Challenge this week calls for a stencil.
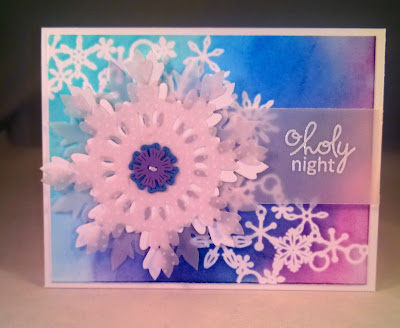
I sponged on some Distress inks for a night sky background after adhering my Memory Box: Delicate Snowflake to my cardstock.
I die cut the PTI's Damask Snowflake from white, vellum and patterned vellum paper for a three layer snowflake.  I used the Button Stacks dies in blueberry sky and winter wisteria for the center of the snowflake.
The sentiment is from Paper Smooches: A Blessed Christmas.
 
I hope you will check out the inspiration from the design team and get ahead of your Christmas cards for this coming year! 

Have a great week Friends!

The Challenge # 34 Colors!

Welcome everyone.   
Today I am the Guest Designer on "THE CHALLENGE" after my polka dot win card a couple of weeks ago. 
It is a color challenge this time around: 


I hope you will go take a look at the challenge and be inspired by the other designers!  Sometimes it is a sketch challenge and like this time, it is a color challenge!
Thanks for stopping by and taking a look!
And thank you all from "the challenge" for selecting my card as the winner!
I am honored and proud to participate with this challenge!

I smooshed orange zest and harvest gold onto the paper first.  I actually dried it with the heating tool because I was impatient to let it sit and dry on its own!
The big banner that I am loving is from PTI is Layered Banner Banter..there are two dies and then stamps that will fit into the banner.  I chose a polka dot orange zest color for the folded layer of the banner.  My big sentiment "celebrate"  was stamped with both harvest gold (at the top) and orange zest at the bottom half of the word.  The "on your birthday is from Lovely Laurels. The balloon is a die and stamp from Simon Says: Birthday Balloons and the string was hand drawn!  I added a few green sequins to the card for some more green!

Thank you so much for taking a look!  Have a great week!

Saturday, May 9, 2015

My craft space

I thought I would give you a sneak peak into my "studio".
When we built this house 8 years ago, I came from a big "playroom" that I shared with two young daughters and lots of junk!
It was hard to know what I needed or how much of this or that I needed!
My work space was an old door with filing cabinets at the end and that was it.  A lot of things were in those plastic storage bins...you know the 6 drawer kind that rolls (which on carpet, it doesn't roll very good if at all!) or the bigger 3 drawer kind that sits on a desk top.
My new room is right off the kitchen, so a pot doesn't boil over very often!  And a sink with water is very close!
The room is approximately 10 x 15 with a 2+ x 4 feet taken out for some mechanical 'things'!
Since I have 6 grandchildren, I did think that at a time or two there might be more than just me in this space!  And I have a BFF who comes down twice a year and we "play" in here for hours at a time!  So I knew I needed a long counter so at least two or three could sit and create.  I used Ikea products to hang all my pencils, scissors, etc to keep them off my desk work space.  The metal buckets at one end are strictly for the kiddos...like crayola pencils and markers and their decorative scissors.  the cabinets were all from Home Depot and I went with open shelving
 I can sit in my chair, look at the computer, swivel to sit and work.  The drawers in the middles hold all the ink pads, dimensional adhesive and lots of other misc. things I use regularly. I try to keep everything within an arms reach that I use most often.  The other end of the counter is used for guests or my kiddos or when I need to spread out!
 This rolling wire rack from Costoc really holds a lot of things!  I had a really neat rustic bookcase in here originally, but you know I went with practical rather than looks...this holds way more of my 'stuff'.
And this counter is opposite my chair, the counter is a bit higher, so it is easier to cut paper, run through the Big Shot and even take pictures.  I store all my paper in the rolling carts so I can always bring it right over to me.  One cart has all PTI paper, watercolor paper, clear paper and glittery paper.  The other cart holds Michaels' paper that my kiddos can use, along with some 12 x 12 designer paper.
And my flooring is all hardwood!  Mesquite to be exact and I love it.  I can roll anywhere, I can find things that fall and my carts with paper can easily roll with me.  And if there is a spill...no problem, easy to wipe up!
So that is it folks.
I am linking this up to Live * Love * Cards blog where Darlene is creating a new craft space in a brand new home!

thanks for taking a look!

Muse: Christmas Visions 1

There is a new challenge in town!
 
I used the colors from Kimberly's card as my starting point.
I die cut the Memory Box "Snowflake" ornament three times out of white paper, having it sit off the paper a bit.  Then I die cut with shiny gold paper and one blueberry sky paper.  I added a piece of acetate behind it so it looks like the ornaments are "floating"  I saw this technique HERE. 
It is called Floating Inlaid and Embossed Die Cuts, except I didn't embosss the die cut, I simply used the gold paper.
I used water color paper and added my blues and golds to it so it shines through the die cut and then added my top layer with the ornaments with dimensional tape.

Congratulation to all the Designers and creator of this new Challenge!  I look forward to playing along!
Here are the rules:

  • Use the inspiration card as a starting point
  • Make a Christmas or winter-themed card, explain your interpretation and link back to Muse: ChristmasVisions.
  • Provide supportive comments to at least 3 of your fellow member’s submissions. 
  • Vote for 3 of your fellow members' submissions that you find inspiring

Thursday, May 7, 2015

Seize the Birthday ~ Using the Negative

 
Welcome to another Seize the Birthday Challenge!
And we have a "Topping" for you this time!
Use your NEGATIVES on your BIRTHDAY card!
I used PTI:  Wishes Come True die and on a separate piece of paper I swiped a rainbow of colors!  I glued that piece down to my cardstock, then using dimensional tape I added the piece with the cut out candles.  My sentiment is from Mama Elephant:  Ella and Friends  I hope you will play along with us, if you do not want to do the "topping" which is using your negative, then just make a birthday card and join in the challenge!


Monday, May 4, 2015

MIM # 211` Using gelatos with stamps

I did have a few gelatos...pinks, blues and some purples...no yellows or greens...so I made do with what I had!  I used a few flowers from Petite Pots, but also a few from an older set called Daydreamer.  I stamped them all on the linen paper, gives a nice texture to the tag!  I also used the older Background Basics:  Gingham for the top of the tag and the side of the card.  The "button" is a die from "Button Stacks" but I don't know which one!  Then I rubbed on the gelato like Melissa showed here.
Thanks for taking a look!
Hope you have a great week!

Heart Hugs!